The PBX Settings module allows administrators to configure the connection between VitXi WebRTC and the VitalPBX server.
This setup is essential for registering extensions, accessing voicemail, managing call history, and synchronizing other PBX-related features.
1. Purpose #
Before VitXi can function correctly, it must be linked to a VitalPBX instance.
This configuration defines the communication parameters such as host address, ports, and authentication credentials that VitXi uses to interact with the PBX API and SIP services.
2. Access the PBX Settings #
- Log in to the VitXi Administrator Panel.
- Navigate to Management → PBX Settings.
- The interface will display the current connection configuration.
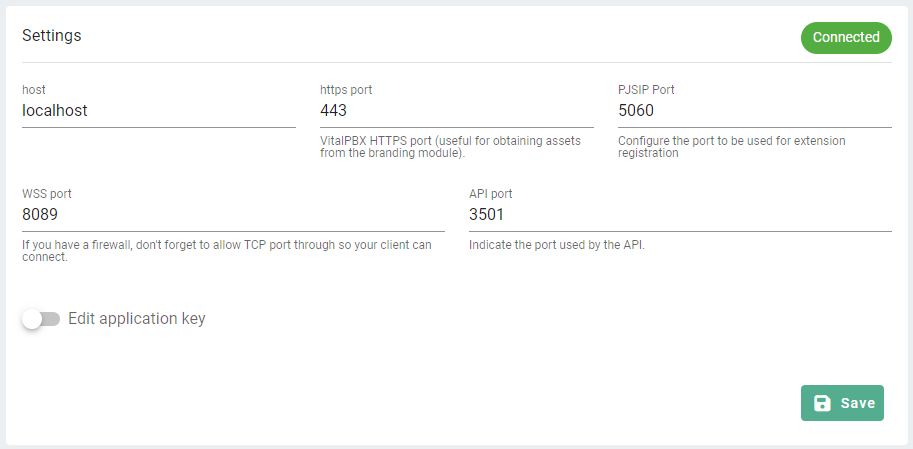
3. Configuring the Connection #
Fill out the following fields to establish a successful link with your PBX:
| Field | Description |
|---|---|
| Host | The IP address or FQDN (Fully Qualified Domain Name) of the VitalPBX server. |
| HTTPS Port | Used by VitXi to retrieve assets and communicate securely with the PBX (default: 443). |
| PJSIP Port | The port used for SIP/WebRTC extension registration (commonly 5060 or 5061). |
| WSS Port | The WebSocket Secure port for real-time WebRTC signaling (default: 8089). |
| API Port | The port used by the PBX API for data exchange with VitXi (default: 3501). |
Important:
If a firewall is enabled, make sure these ports are open for TCP traffic so VitXi clients can connect without interruption.
4. Application Key Management #
The Application Key is a unique token that authenticates VitXi’s connection to the VitalPBX API.
- When VitXi is installed on the same server as VitalPBX, the key is generated automatically.
- If VitXi is installed on a different server, you must generate an API key manually in VitalPBX → Admin → Application Keys and paste it into this section.
To edit the key:
- Toggle “Edit Application Key”.
- Enter the new API key.
- Click Save to apply changes.
Tip: Always keep your application key secure. It allows full API access between VitXi and VitalPBX.
5. Connection Status #
Once the configuration is complete, the connection status indicator (top right) will display:
🟢 Connected – VitXi successfully communicates with the PBX.
🔴 Disconnected – Connection failed. Check your host, ports, SSL certificates, or firewall settings.


