After installing VitXi WebRTC and preparing your VitalPBX server, the next step is to run the VitXi installation wizard.
This guided process will help you complete the initial setup, link VitXi with VitalPBX, and prepare the system for user management.
Access the VitXi Web Interface #
Once VitXi is installed, open a web browser and go to your VitXi domain or FQDN.
Example: https://your-domain.com/webrtc
If VitXi is freshly installed, the Setup Wizard will automatically start and guide you through three key stages:
- Database Settings
- VitalPBX Connection Settings
- User Setup
Step 1: Database Settings
In this step, you’ll configure the database connection used by VitXi.
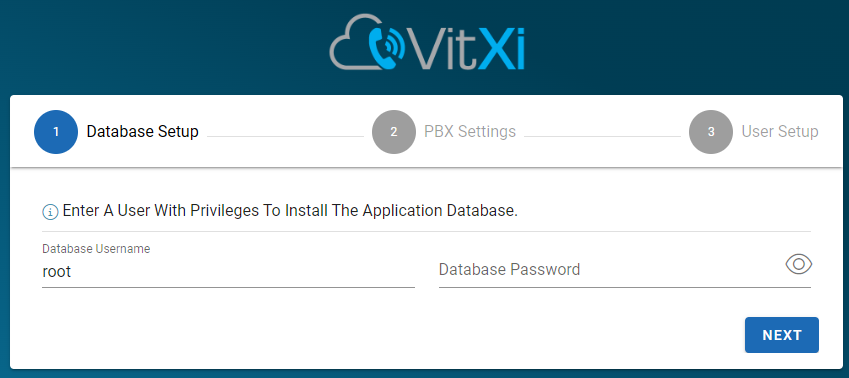
| Field | Description |
|---|---|
| Database User | Enter your MySQL username. If you are installing VitXi on the same server as VitalPBX, you can leave this as root with a blank password. If installing on a different server, you’ll need to create a dedicated MariaDB user with remote access permissions. |
| Database Password | For local installations, the default root user does not require a password. For remote installations, use the credentials of the new MariaDB user you created for VitXi. |
Step 2: VitalPBX Connection Settings
This section establishes communication between VitXi WebRTC and your VitalPBX server.
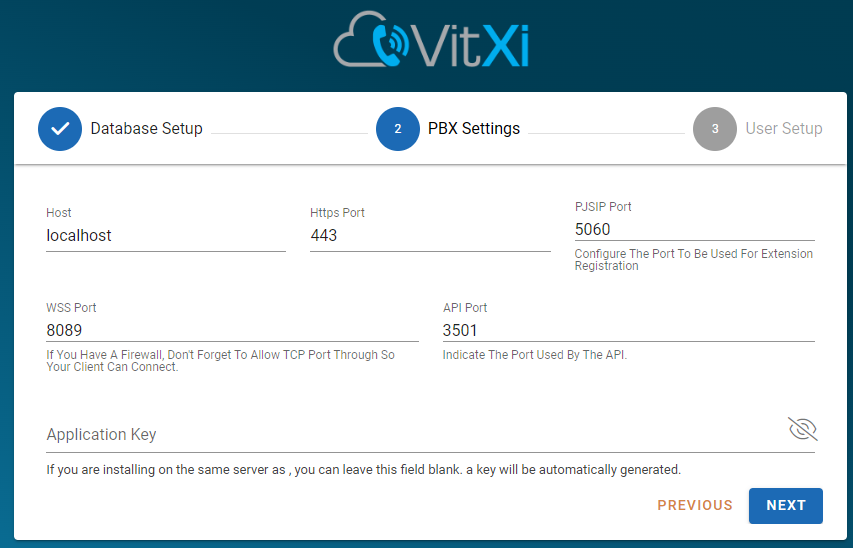
| Field | Description |
|---|---|
| Host | If VitXi is installed on the same server as VitalPBX, set this to localhost. Otherwise, enter the remote IP address or hostname of the VitalPBX server. |
| HTTPS Port | The HTTPS port used by VitalPBX (default: 443). This is required for asset retrieval (e.g., branding module). If your PBX only uses HTTP, you may use port 80, but HTTPS is strongly recommended for VitXi WebRTC. |
| PJSIP Port | The port used for extension registration via PJSIP. Usually 5060 or 5061. |
| Application Key | If VitXi is installed on the same server, this field is automatically generated. If it’s on a different server, you must generate an API key in VitalPBX under Admin → Admin → Application Keys, then copy and paste it here. |
| WSS Port | WebSocket Secure (WSS) port used for real-time signaling between VitXi and VitalPBX. Ensure that this TCP port is open in your firewall. |
| API Port | The port used by the VitalPBX API. If you haven’t changed it, you can leave the default value. |
Important:
If VitXi and VitalPBX are hosted on separate servers, make sure that all required ports (HTTPS, API, PJSIP, and WSS) are open on your firewall to allow proper communication.
Step 3: User Setup
In this final step, you’ll create the super administrator account for VitXi.
This user will have full access to all configuration areas and management tools.
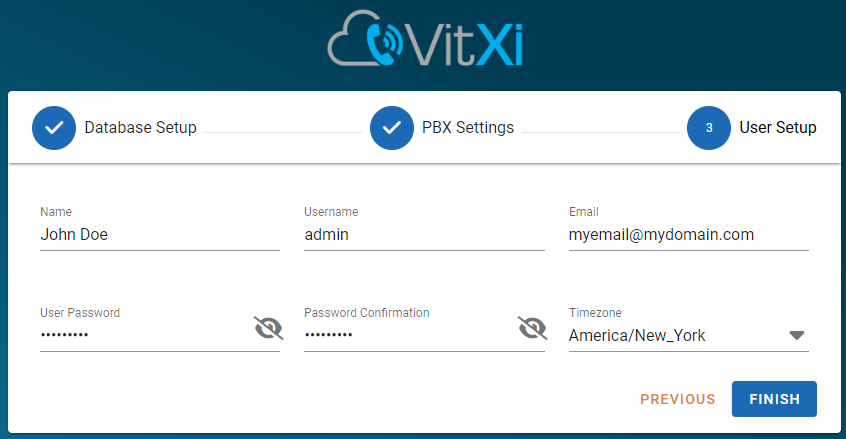
| Field | Description |
|---|---|
| Name | The full name of the administrator. |
| Username | The login username for the VitXi admin panel. |
| Used for password recovery and notifications. | |
| Password | Set a strong password for the admin user. |
| Confirm Password | Re-enter the password to confirm. |
| Timezone | Select your preferred timezone for accurate logs and call records. |
After filling in the details, click Finish to complete the installation.
After Installation #
Once setup is complete:
- You’ll be redirected to the VitXi login page.
- Log in using the super admin credentials you just created.
- From the dashboard, you can begin configuring users, assigning extensions, and managing permissions.
Tip: If you ever need to update connection parameters or database settings later, you can do so from the VitXi Administration Panel.


